VIDEO & SOUND PRODUCTION/(Project1)
VIDEO & SOUND PRODUCTION/(Project1)
Liu Chengrui (0370930)
Video and sound production
Instructions
Lecture notes
Week 3 (08/10/24)
Asynchronous class materials Storyboard
What is a storyboard?
Storyboard in filmmaking is a visual representation of a film, animation, or video game, much like a comic strip. It's made up of a series of illustrations or images displayed in sequence for the purpose of pre-visualizing a motion picture, animation, motion graphic or interactive media sequence.

Traditional vs. thumbnail
Traditional storyboards are what we see above — basic pencil sketches that include detailed information like arrows for camera movement, characters, props, etc.
There are also thumbnail style storyboards that don’t have any writing.
How to storyboard film scenes with Milanote?
1. Identify key scenes in the script.
When creating a storyboard, it’s crucial to know what story you’re telling. The best starting point is to break up the script or narrative you’ll be working from.

2. Map out the key scenes.
Next, map out the scenes you identified in the script.

3. Add images or sketches.
Now it’s time to begin visualizing each scene. This part of the process has been referred to as “idea landscaping”—a place to brainstorm the visual features of each beat within the landscape of a story.

4. Describe what happens in each frame.
While each frame is a static image, try to communicate how it will look and feel as a moving sequence.
- Composition and Framing: Decide how characters and objects will be framed within each shot. Use the rule of thirds and other compositional techniques to create visually appealing and balanced frames.
- Transitions: Plan how each shot transitions to the next. Smooth transitions create a cohesive flow, while abrupt changes can be used for dramatic effect.
- Character Blocking: Determine character positions and movements within each shot. Show how they interact with each other and the environment.
- Emotion and Expression: Define a character's facial expressions and body language to capture their emotions and reactions.
- Annotations: Use additional notes or captions for things that can't be easily conveyed in the visuals.
- Dynamic Action: For action scenes, break down fast-paced movements into a sequence of panels to ensure clarity.

5. Share it with your team.
When you're ready, invite your team to review your storyboard and share their feedback.

6. Finally, reference it on the day.
Traditionally, you'd print out your storyboards to refer to on the day, but online storyboards can be accessed on phones or laptops.

These contents let me feel the storyboard in film and television production. It is not only a visual tool, but also a bridge between creators and teams to communicate stories and visual styles. Through clear images and detailed annotations, storyboard help team members develop a unified visual and emotional understanding before shooting, which is critical to creative efficiency and quality.
I understand that the process of creating storyboard is both creative and technical. It requires not only an artistic eye to design images, but also an understanding of camera language, character dynamics, and narrative rhythms.
Quiz:
Week 4 (15/10/24)
Asynchronous class materials Production
Production stages
three main phases:
1.pre-production
This is the planning stage of filmmaking, where all the necessary preparations are made before filming begins.
2. production
This is the stage where the actual filming takes place. The production team will work together to capture all the footage needed for the film, using the plans and preparations made during pre-production as a guide.
3.post-production
This is the stage where the footage is edited and assembled into a final product. This includes tasks such as cutting and arranging scenes, adding music and sound effects, colour grading, and visual effects.
Production Crew
1.Director:
The director is responsible for overseeing the entire production and ensuring that the creative vision for the project is realised.
2.Producer:
The producer is responsible for the logistical and financial aspects of the production.
3.Cinematographer:
The cinematographer, also known as the director of photography (DP), is responsible for the visual aesthetic of the film.
4.Production Designer:
The production designer is responsible for the overall visual design of the film, including the sets, costumes, and props.
5.Sound Designer:
The sound designer is responsible for the audio aspects of the film, including recording and editing dialogue, sound effects, and music.
6.Editor:
The editor is responsible for assembling the footage into a coherent and compelling story.
Feedback:
First, I realized the importance of pre-production. It is the foundation of the success of the film, and all the careful planning and preparation work laid a solid foundation for the subsequent shooting and editing.
In the production stage, the real shooting process made me feel the charm of creation. The close collaboration of the director, cameraman and other crew members is able to bring the idea to life and capture every detail.
Post-production is the key to integrating all the material into a coherent story. Through editing and sound manipulation, editors are able to give the film rhythm and emotional depth, and immerse the audience in the story.
Quiz:
Week 7 (5/11/24)
Asynchronous class materials Film Sound
How to use sound effects
Step 1: Create ambient sound
Ambient sound is the most common way filmmakers use sound effects.
Step 2: Establish some realism
By adding appropriate sound effects (or, in some cases, creating new ones with Foley artists), you can establish realism right off the bat.
Step 3: Use nonverbal storytelling
All living creatures use nonverbal communication. In the case of humans, our brains process more than just physical gestures. We can also hear a sound or see an image and understand a variety of meanings or suggestions.
Step 4: Add sound effects for tension
Sound effects can tell the story of a location or character. And you can do that within a scene that is already pushing other plot points forward.
Distant voices and car sounds can create the illusion of a busy street, even if there’s no one around.
Step 5: Shift audience emotions
Filmmakers understand how music can steer an audience’s emotions. There is a lot of research on how music affects the human brain, and that is going to continue for the foreseeable future.
Step 6: Find sound effects
And hopefully you also realized that using sound design relies more on your vision for the film than any experience as a mix engineer or Foley artist.
Quiz:
Exercises
Week 3
· EX1 / AUDIO DUBBING
We were asked to complete work sheets this week, which included elements like Sound Effects and Ambience Sound, in addition to doing post-sound work based on a video with no sound and some of the lines in the video.

The process of making the form1
Work on Pr software:
This is what we asked for when we edited the video
Record all dialogues with your phone (import to premiere)
Prepare all hard sound effects (import to premiere)
Prepare ambient sound (import to premiere)
Place audio files on timeline and sync it with video.
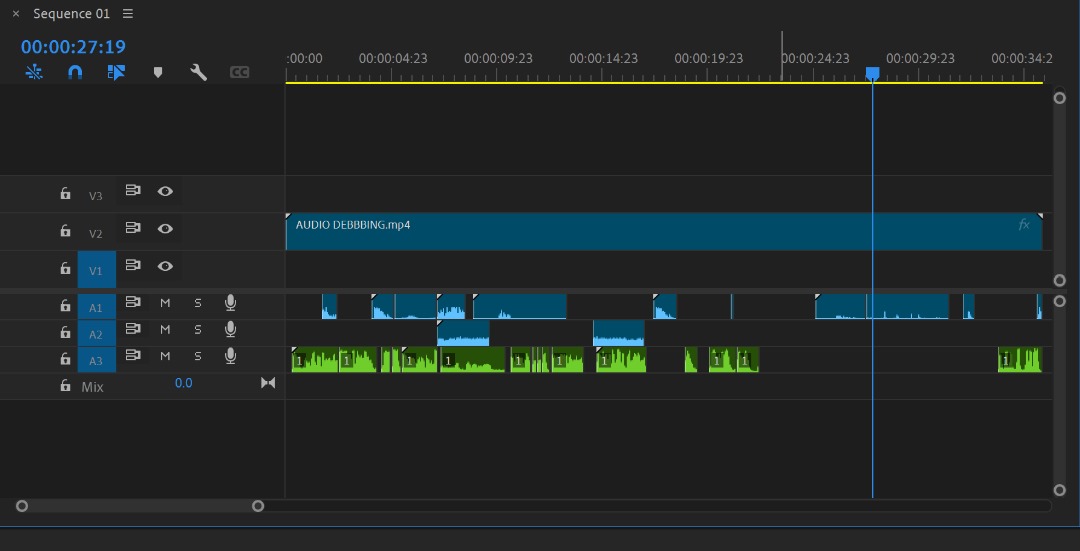
Audio track:
3 tracks for dialogue, one character, one track.
4 tracks for sound effects,
3 tracks for ambience sound.
Edit voice from female to male, male to female, human to cute animal/adult to kid: Premiere Pro → Audio Effects → Pitch Shifter → Semi tones. Volume: Dialogue: between -6dB & -12dB, Ambience: below -20dB, Hard sound effects: Depend.)

Import sound effects and lines
Then I matched the speed of the words to the speed of the sound.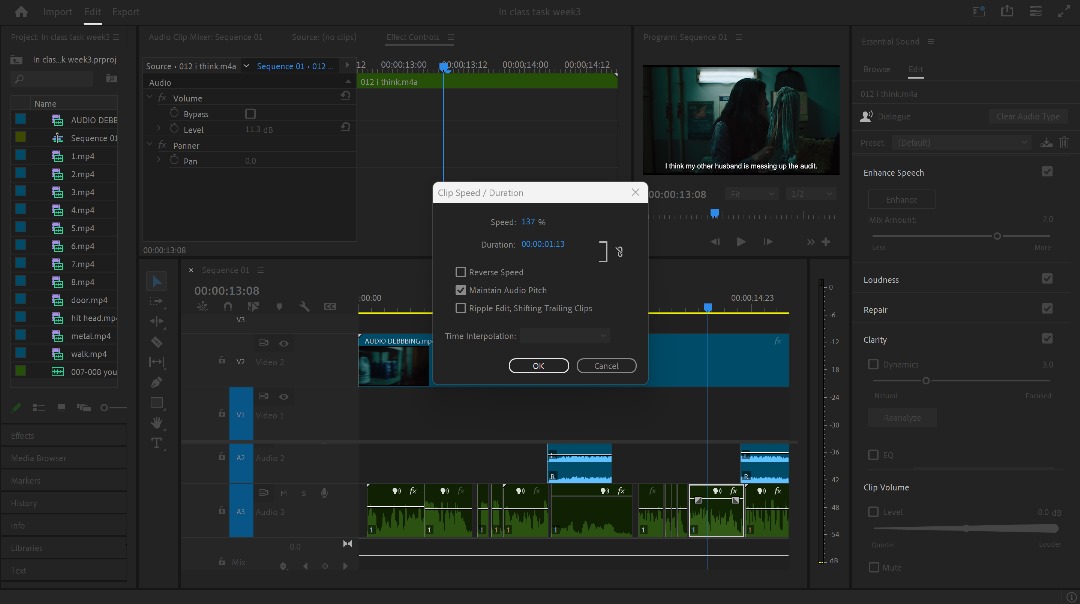
Change the pace of the conversation
The final screenshot
This is the clip I made without the lines (just sound effects).
This is the video clip I made after adding the lines and perfecting the sound effects
Week 7
· EX2 / Audio EDITING: Sound SHaping with EQ
In this week's class, we learned a new sound software AU, Mr. MARTIN showed us how to make multi-track audio and change the tone of audio and other elements to achieve the sound in different environments.
According to the requirements, we need to produce the following five kinds of audio:
Voice of phone call
Voice coming from inside of the closet
Voice of toilet/bathroom
Underground cave
Alien/ Orc voice
Voice of phone call

Adjusted parameter(Voice of phone call)
Voice coming from inside of the closet

Adjusted parameter(Voice coming from inside of the closet)

Adjusted parameter(Voice of toilet/bathroom)
Underground cave

Adjusted parameter(Underground cave)
Alien/ Orc voice
When I make audio with alien features, I try to use distortion effects to add a biotech or mechanical sound.
Adjusted parameter(Alien/ Orc voice)
In addition to this, I also lowered the pitch of the audio so that it sounded more like the deep voice of an alien being.
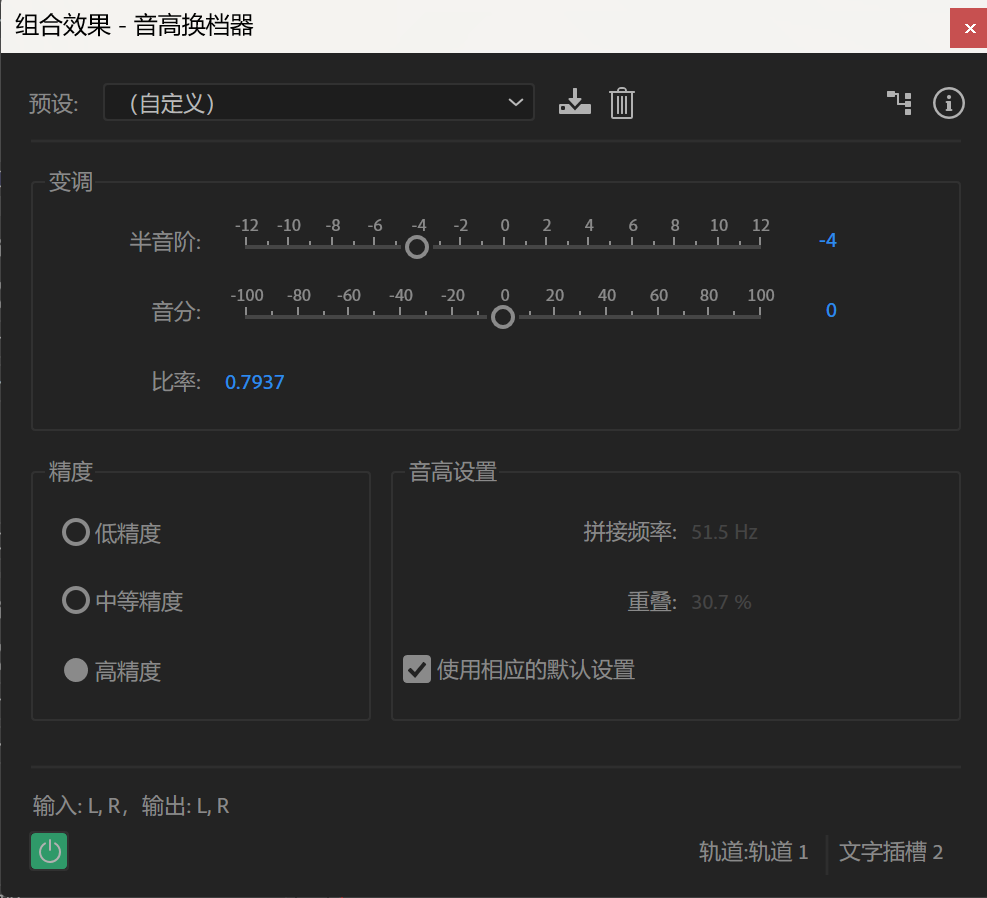
Adjusted parameter(Alien/ Orc voice)
Reflection
At the beginning of the project, we first carried out a detailed analysis of the plot of the film and assigned each character according to their personality and characteristics. The first challenge we faced was how to get the team members to adapt to their roles and get into the mood naturally, given their different acting experiences. After much communication and character auditions, we finally determined the roles and made sure everyone had a clear understanding of their tasks.
The shooting phase is the most tedious but also the most fulfilling part of the production. In practice, we encountered the following difficulties:
Setting and light control: In order to restore the atmosphere of the film, we need to find a suitable shooting location and arrange the scene. At the same time, the change of light often affects the shooting effect, how to keep the light consistent becomes a big problem.
Character performance and camera connection: During filming, the actors' performances were sometimes difficult to achieve at once, resulting in the need for repeated shots. At the same time, in order to ensure that the flow between shots is smooth, we need to strictly control the timing of character movements, dialogue and camera cuts.
Post-editing is an important part of putting all the shots together to form a complete work. The biggest challenge I faced in the editing process was how to get the rhythm and the continuity of the story. We need to screen and splice multiple shots, and adjust the length of each shot to ensure the overall smooth and natural. In addition, in order to increase the emotional appeal of the film, I also added background music and sound effects, and repeatedly adjusted the volume and rhythm to make it perfectly integrated with the picture.
This shooting made me deeply understand that video production is a work that requires teamwork, creative thinking and technical support. From character assignment to shooting, to the final editing and sound addition, every step was full of challenges, but it also allowed me to gain a lot of valuable experience.


Comments
Post a Comment